Saturday, November 17, 2012

DIV Blog: Day 2

Day 2 at DIV XXII started off slowly for me, but ended up being another really great day for Civil War relics.  Once again I spent most of the day detecting with my NC friends Jim, Dwight, and Glenn.  We detected at a new section of the farm, starting at the top of a hill and working down.  The soil here was some of the worst I've ever encountered, and detecting was challenging to say the least.  I managed a few bullets in the morning, and then an iron trigger guard from a musket.  The iron loop on the front of the guard would have been used to attach the rifle sling.


After that find, I hit a dry spell for quite some time.  After checking in with Jim and telling him about my slump, he suggested I head to one small section of the field where electromagnetic interference from nearby electrical lines made some of the high-end detectors unstable.  Since many people will avoid these areas, and my DFX is less affected by the EMI, he thought I might be able to find a bullet over there.  I went exactly where he had pointed, and dug a three ring bullet within just a few minutes.  As it turns out, there was a small pocket of bullets in that area, and within fifteen minutes I had dug three more, including a pulled three ring bullet and two Confederate gardner bullets.  I have only dug one gardner before this, so I was thrilled to find them.


I found two more bullets before the day was out, a three ringer and a colt pistol bullet.  With just a few minutes left to go, I found another musket piece, the trigger assembly!  It's humbling to think of the history contained in that small piece of iron.  When I got a chance to start cleaning my finds at the hotel, I discovered that one of the three ringers I had dug included a star in the base.  This is a maker's mark used by the Washington Arsenal, and is the second such bullet I have dug (the first at DIV XIX at Hansbrough ridge).  It was another great day of digging, and I am having a blast up here in ol' Virginia!  Until next time, thanks for reading!

Friday, November 16, 2012

DIV XXII: Day 1


DIV got off to a great start today!  I hunted with my NC detecting friends most of the day.  The highly mineralized soil of Northern Virginia makes finding targets with a VLF detector (like my White's DFX) rather difficult at times, and I dug a LOT of scrap iron as a result.  The corn stalks made detecting somewhat challenging as well.  But there were plenty of good targets to find, and I’m very happy with the results of my first day out.


In addition to some broken glass and melted camp lead, I recovered a total of twelve bullets.  I found another 69 caliber Minie ball which are massive bullets and always a pleasure to find.  You may recall that I found several 69 Caliber Minies in this same area at DIV XX in March 2011.  The three ring bullet with a post on the base is a Williams Cleaner Type 1, a welcome change from the Type 3 zinc plunger cleaners we typically find at late-war sites in North Carolina.  My favorite bullet for the day is a melted round ball from a type of ammunition known as “buck and ball.”  This round includes a large round ball on the bottom and three smaller buckshot balls on top, firing additional projectiles with each shot for an increased chance of striking the enemy.  This particular buck and ball round appears to have been melted in a fire, and one of the loose buck balls has fused to the larger round bullet.

I also recovered two Union general service eagle buttons.  One has significant damage to the front (likely from a plow), but the other is in excellent condition and has a gorgeous green patina.  I’ll post better pictures of the buttons in my DIV recap post at the end of the hunt.

The best find that I witnessed today was in the form of multiple bullets in one hole – a LOT of bullets!  At the end of the day the count was well over 100 Minie balls, and there were clearly more in the hole.  We can only speculate why so many were either lost, forgotten, or discarded all at once.

Well, I’m incredibly sore from 10 hours of non-stop digging, so it’s back to bed so I can do it all again tomorrow!  Thanks for reading!

Thursday, November 15, 2012

DIV Blog: Day 0

Well, it's that time again.....

DIGGIN' IN VIRGINA!

I was fortunate enough to have been selected once again for DIV, and invitational group relic hunt held twice yearly.  This year's hunt (DIV XXII) is being held at the Beauregard Farm near Brandy Station, VA.  The farm was home to part of the Battle of Brandy Station as well as both US and CS winter camps.

It has been a long day getting up to Virginia and preparing for the dig, including attending the pre-hunt meeting earlier this evening.  It was great fun seeing a number of friends who I haven't been around since the last DIV event in March of this year.  For now, though, I need to try and get some sleep.  The three day hunt starts tomorrow, and I will need all the rest I can get.  I will update the blog again tomorrow night with the results from Day 1.  Wish us luck!!

Saturday, November 10, 2012

Bullets and buttons on a gorgeous November day

My good friend Jim has been doing some research to find a particular spot where part of the Union army camped in 1865, and invited me along to check it out with him. I'm really impressed with the thoroughness of his work in tracking down some of these places, and the history of the people who were there. His attention to detail is incredible and his passion for history is contagious.  It really has been a pleasure getting to know Jim and working with him to recover some history.  We've made several unsuccessful attempts to locate this camp lately, but yesterday we finally found it!  Congratulations, Jim - you did it!  And to top it off, the landowner was among the most accommodating that I've had the pleasure of working with.  He even went so far as to bring us cold drinks after a few hours!


Here are the period relics I was able to recover. The top row are all three ring Minie ball bullets, three 58 calibers and one 54 caliber on the right.  The two bullets in the center row are a fired 44 caliber colt pistol bullet on the left and an unfired Sharps carbine bullet on the right.  On the bottom row are fired Spencer carbine bullets.  Unlike many other Civil War bullets, which used a paper or skin cartridge, the Spencer bullets used a brass rimfire cartridge.  I recovered one Spencer cartridge casing, shown between the two bullets.  I'm quite happy with the condition on this casing, as they are fragile and often heavily damaged when recovered from the ground.


The button in the center is a Federal Staff Officer's button.  It's shown above with a similar non-dug example from the Ridgeway reference archive. Unfortunately the back is missing entirely, and only the front was recovered.  This is a first for me, and I'm very happy to have recovered it.  The condition is lacking, due to corrosion from its time underground, once again stressing the importance of recovering these relics before they are destroyed by time and the elements.


I also found two other buttons that predate the war.  The button on the left is known as a tombac button, which I have discussed previously after digging one right here in Saxapahaw.  The tombac alloy resists corrosion, and is still shiny despite being lost in the late 1700's to early 1800's.  They are somewhat brittle, however, as you can see by the fragmentation of part of this one.  On the right is a civilian flat button, with some of the original gold gilt remaining on the back.  This type of button probably dates to the 1830's to 1850's.

I'll leave you with one of my favorite sites to see - the bright white patina of a Civil War bullet seeing the light of day for the first time in nearly 150 years...

Sunday, November 4, 2012

Civil War relics, and a 19th Century Nickel

Hey everyone!  Here are the results from my last two trips out with my good friend Jim.  We managed to get into another pocket of relics, dropped by Union troops under General Sherman as they made their way through central North Carolina.  The first day was all about lead for me, and I recovered six 58 caliber three-ring Minie balls.  I also found the top half of another bullet, which had been cut off by a soldier, either out of boredom or to create some form of "camp art."  Jim found an ornate carved bullet nearby that was almost certainly a chess piece (perhaps a bishop or queen), and it's possible that this cut-off bullet may have been a pawn, though this is of course speculation.  It may well have been cut in half simply out of boredom, for some other purpose, or for no reason at all - we'll never know for sure.  In any case, these modified bullets have a much more personal connection to the individual soldier, and are among my favorite relics to find.


Though the number of relics was fewer on the second trip out, I'm very happy with what I was able to find.  I added one more 58 caliber bullet this time out.  The other bullet is the top half of a Williams cleaner, missing the zinc base, but is a bit more special than a typical dropped bullet.  The markings dug into the top of the bullet indicate that it was loaded into a rifle, and then subsequently pulled out again.  A corkscrew device known as a puller or worm was used to grab onto the bullet in the bottom of the barrel and pull it back out to safely unload the weapon.


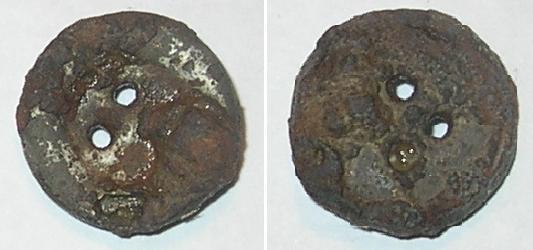
The rusty iron object is actually a four-hole underwear button, as excavated.  I have also included a picture of the button after removing much of the rust buildup  Unfortunately this is as far as I could go with cleaning it before starting to lose base metal, so I went ahead and applied a protective coat, and hopefully it won't degrade too much more.


The brass piece shown above the pulled cleaner bullet is referred to as a "J hook."  This is the first complete J hook that I have ever found, so I was very excited to recover it.  The button end was used to affix the hook to a leather strap on a knapsack, while the hook end was used as a fastener or hanger.  Below is a picture of a complete knapsack, with two brass J hooks attached.


I was very excited to dig a coin back there, hoping it was from the Civil War. Unfortunately it turns out it's post war, an 189? Liberty Head or V Nickel. While unrelated to the Civil War activity of the area, it's still a neat 100+ year old find. It must have been dropped by one of the hunters who left behind all the shotgun shell heads I keep finding out there!

Wednesday, September 26, 2012

Iron Relic Electrolysis

In my last post, I showed off a couple of cool iron relics that I recovered at the site of Mower's Charge in Bentonville, NC.  Lead and brass relics can be damaged by farm equipment, construction, fertilizer, and moisture in the ground, but are typically fairly stable once removed.  Iron relics, on the other hand, present an interesting challenge.  While they are also damaged by time underground, the rate of corrosion of iron objects rapidly increases once brought out into the atmosphere.  As a result, we have to take steps to remove the oxidation (rust) that is present upon recovery and protect the artifact from further damage.

One of the most effective methods for removing the rust layer is known as electrolysis.  Here's a picture of my electrolysis rig, and although it's a bit crude in aesthetics, the design is essentially the same as those used by universities and professional laboratories to preserve iron artifacts.  NOTE:  Electrolysis can be a very dangerous process, involving electricity with exposed wires and the generation of potentially harmful, flammable, and/or explosive gasses.  Don't try this at home.  Or if you do, be safe, use adequate ventilation, and don't say I didn't warn you.


My rig consists of a plastic container (in my case, a 5 gallon bucket) filled with an electrolyte solution (I used Cascade dish soap, primarily sodium carbonate).  In the solution are two electrodes.  For a positive electrode, I used stainless steel flashing left over from a construction job (EDIT:  I've recently learned that SS results in harmful byproducts, and should be avoided.  Use iron rebar, instead).  As you can see in the picture, I used two pieces on opposite sides of the tub to provide an even current distribution, and connected them together using four lead wires.  The negative electrode will be the iron relic to be cleaned.  In my setup, it is suspended by a crossbar using two connected wire leads.  It is very important that the two electrodes not come into contact with each other!  The positive and negative electrodes are connected to a battery charger (I used either 12V 6A or 12V 2A settings, depending on the object being cleaned).  When the current is supplied by the battery charger, the relic will start to bubble as iron oxide is stripped away, leaving a rust-free artifact.  If you're interested in learning more, I would highly recommend this video from relic hunter Beau Ouimette showing his electrolysis unit in action.


Here is a before and after showing the CS pentagonal cavity shell fragment after the first round of electrolysis.  I will most likely run it through again to remove some of the remaining stubborn rust spots, but you can already see a tremendous improvement.

A more striking example is the lock plate from an Enfield rifle found last weekend.  What was once a glob of rusted iron has been transformed to reveal the mostly-intact mechanism from inside the rifle.  The next step will be to remove excess water from the iron by soaking in acetone, and finally sealing the relic with a hot wax to prevent further rusting.


I do hope this post has been helpful (or at least entertaining).  Thanks for reading, and I look forward to showing you what I dig up next!

Monday, September 24, 2012

Detecting the Battle of Bentonville

The Battle of Bentonville, North Carolina took place on March 19-21st, 1865.  It was the last great offensive for the Confederate Army under General Joseph E. Johnston, commanding about 20,000 men.  The Union, under General William T. Sherman, was comprised of about 60,000 men.  The results of those three days of combat were more than 3,000 men killed or wounded, along with a decisive Union victory that left the Confederate army fleeing and the end of the war in sight.


On the third and final day of the battle, March 21st, General Joseph Mower requested permission to conduct “a little reconnaissance” to his front on the Union right wing.  This quickly escalated, and he lead two brigades on a full scale attack on the Confederate left wing, defending General Johnston’s headquarters as well as the highly important Mill Creek bridge.  This attack, which became known as Mower’s Charge, broke the confederate flank and reached as far as Johnston’s headquarters, forcing a Confederate retreat.  The charge was ended by a counterattack from Confederate General William Hardee (whose only son was mortally wounded during the counterattack), as well as orders from General Sherman to pull back to avoid a larger confrontation.  During the night of March 21st, the Confederates retreated across the Mill Creek bridge, ending the battle.  The drawing above is a depiction of Mower's Charge from the Frank Leslie Illustrated Newspaper.


With field crops now being to be harvested, I was able to get out with my good friend Jim to do some detecting near the site of Mower’s Charge.  I had some very good luck this trip, and broke out of my recent detecting slump in a big way.  Above is a picture of all my finds from the battle.

I recovered three bullets during the day.  The center bullet is an unfired 58 caliber three ring minie ball, the most commonly used ammunition.  To the left is another 58 caliber bullet, heavily deformed from impact after firing.  This is an excellent example of the power of the weapons used, and shows why they were capable of such devastating wounds.   On the right is another type of minie ball, this one a 577 Enfield bullet.  This is a much less common round, and only the third such bullet that I have personally recovered.


After the battle, Union Lt. Matthew Jamison of the 10th Illinois wrote “[We] form line of battle in a heavily wooded country and move forward instantly, scarcely giving time to form the line and to allow the skirmishers to deploy.  Nothing joins our extreme left – skirmishers engaged – as we advance rebel batteries shell us.”  He is describing the advance of Mower’s Charge, and the Confederate batteries (groups of typically four cannons each) firing explosive projectiles (shells) towards their approach.  One of my finds includes this heavy piece of iron, a fragment from a Confederate pentagonal cavity exploding shell.  The pentagonal internal cavity, filled with gunpowder and a particular geometry used exclusively by late-war Confederate artillery, allowed for more consistent fragmentation upon detonation and thus greater damage to enemy troops below.  I have discussed this type of projectile previously, this being the second pentagonal cavity shell fragment I have found near Mower’s charge.

My favorite find the day, though, is this rusted iron piece – a lock plate from a rifle broken or lost during the battle.  It is most likely from an Enfield rifle, although several other less common rifles used similar locks.  The hammer on the outside (which would strike the percussion cap to fire the weapon) is missing, but the internal mechanism seems to be quite intact.  Below are pictures of an original Enfield rifle showing how the lock plate attached to the gun, along with a reproduction lock plate showing the internal mechanism.  I will clean and preserve the iron by electrolysis to prevent further corrosion, and will post new pictures of the results when that is complete.

It is difficult to comprehend the circumstances of that day on March 21st, 1865 when this gun was lost.  We will never know for sure exactly why it was left there, given the incredible amount of musket fire, artillery explosions, fierce fighting, injury and death that was going on around it.  Artifacts like this always provide such a personal connection to the war that was so brutal on both sides.  That is the reason I pursue this great hobby of relic hunting, and share it with you here on Detecting Saxapahaw.


Last but not least, in case you thought it was too easy, here’s an example of some of the many pounds of junk I carted away!  Thanks for reading, and stay tuned for my upcoming electrolysis update!